It is very simple to collect and send the soil samples for testing.
you will need
2 large bags (plastic)
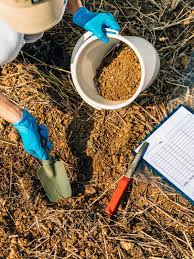
1 small digger or a shovel
1 Pen and labels ( paper)
Land for testing
1. Choose a day after the rain fall and rain has dried to a large extent but moisture is still there in the soil.
2. Use the shovel or the digger to dig the soil for about 10 cms ( length of your hand)
3. Dig out some small amount of soil and place it in the plastic bag 1.
4. Dig in 10 random spots across the land where a crop or a garden will grow.
5. Place the dug out soil from each of the 10 spots in the plastic bag 1.
6.Now mix up the soil carefully and throughly with hand.
7. Place the required amount ( as required by the testing company) of the mixed soil in the bag numbered 2.
8. Send the mixed soil to the soil testing company.
9. When the results are provided take it to the local agricultural officer for assessment and correction recommendation.
10. Use the right type of fertilizer to correct the soil.
Note: In most of the western countries soil testing kits are available to test pH only. Testing for pH only may not be enough for best production.
Test the soil once in 2-3 years to make sure you have done the correction for that specific crop you want to grow through narrow gauge root imager.
testing the soil and correcting excessive elements and deficiencies will give best possible yield for the year.
when sending the soil for testing make sure you ask for the NPK and the elements mentioned above (Mg, Mn, Zn, Fe, Cu Mo) to be tested. Ask for pH to be tested. Ask them to test for Aluminium and Manganese saturation percentages. These will give the percentage of these elements available to the plants when growing in the soil. If Aluminium is above 6% you will need to add several tonnes of line to correct the pH. However not all the low pH soils will have Aluminium and Manganese toxicities.
